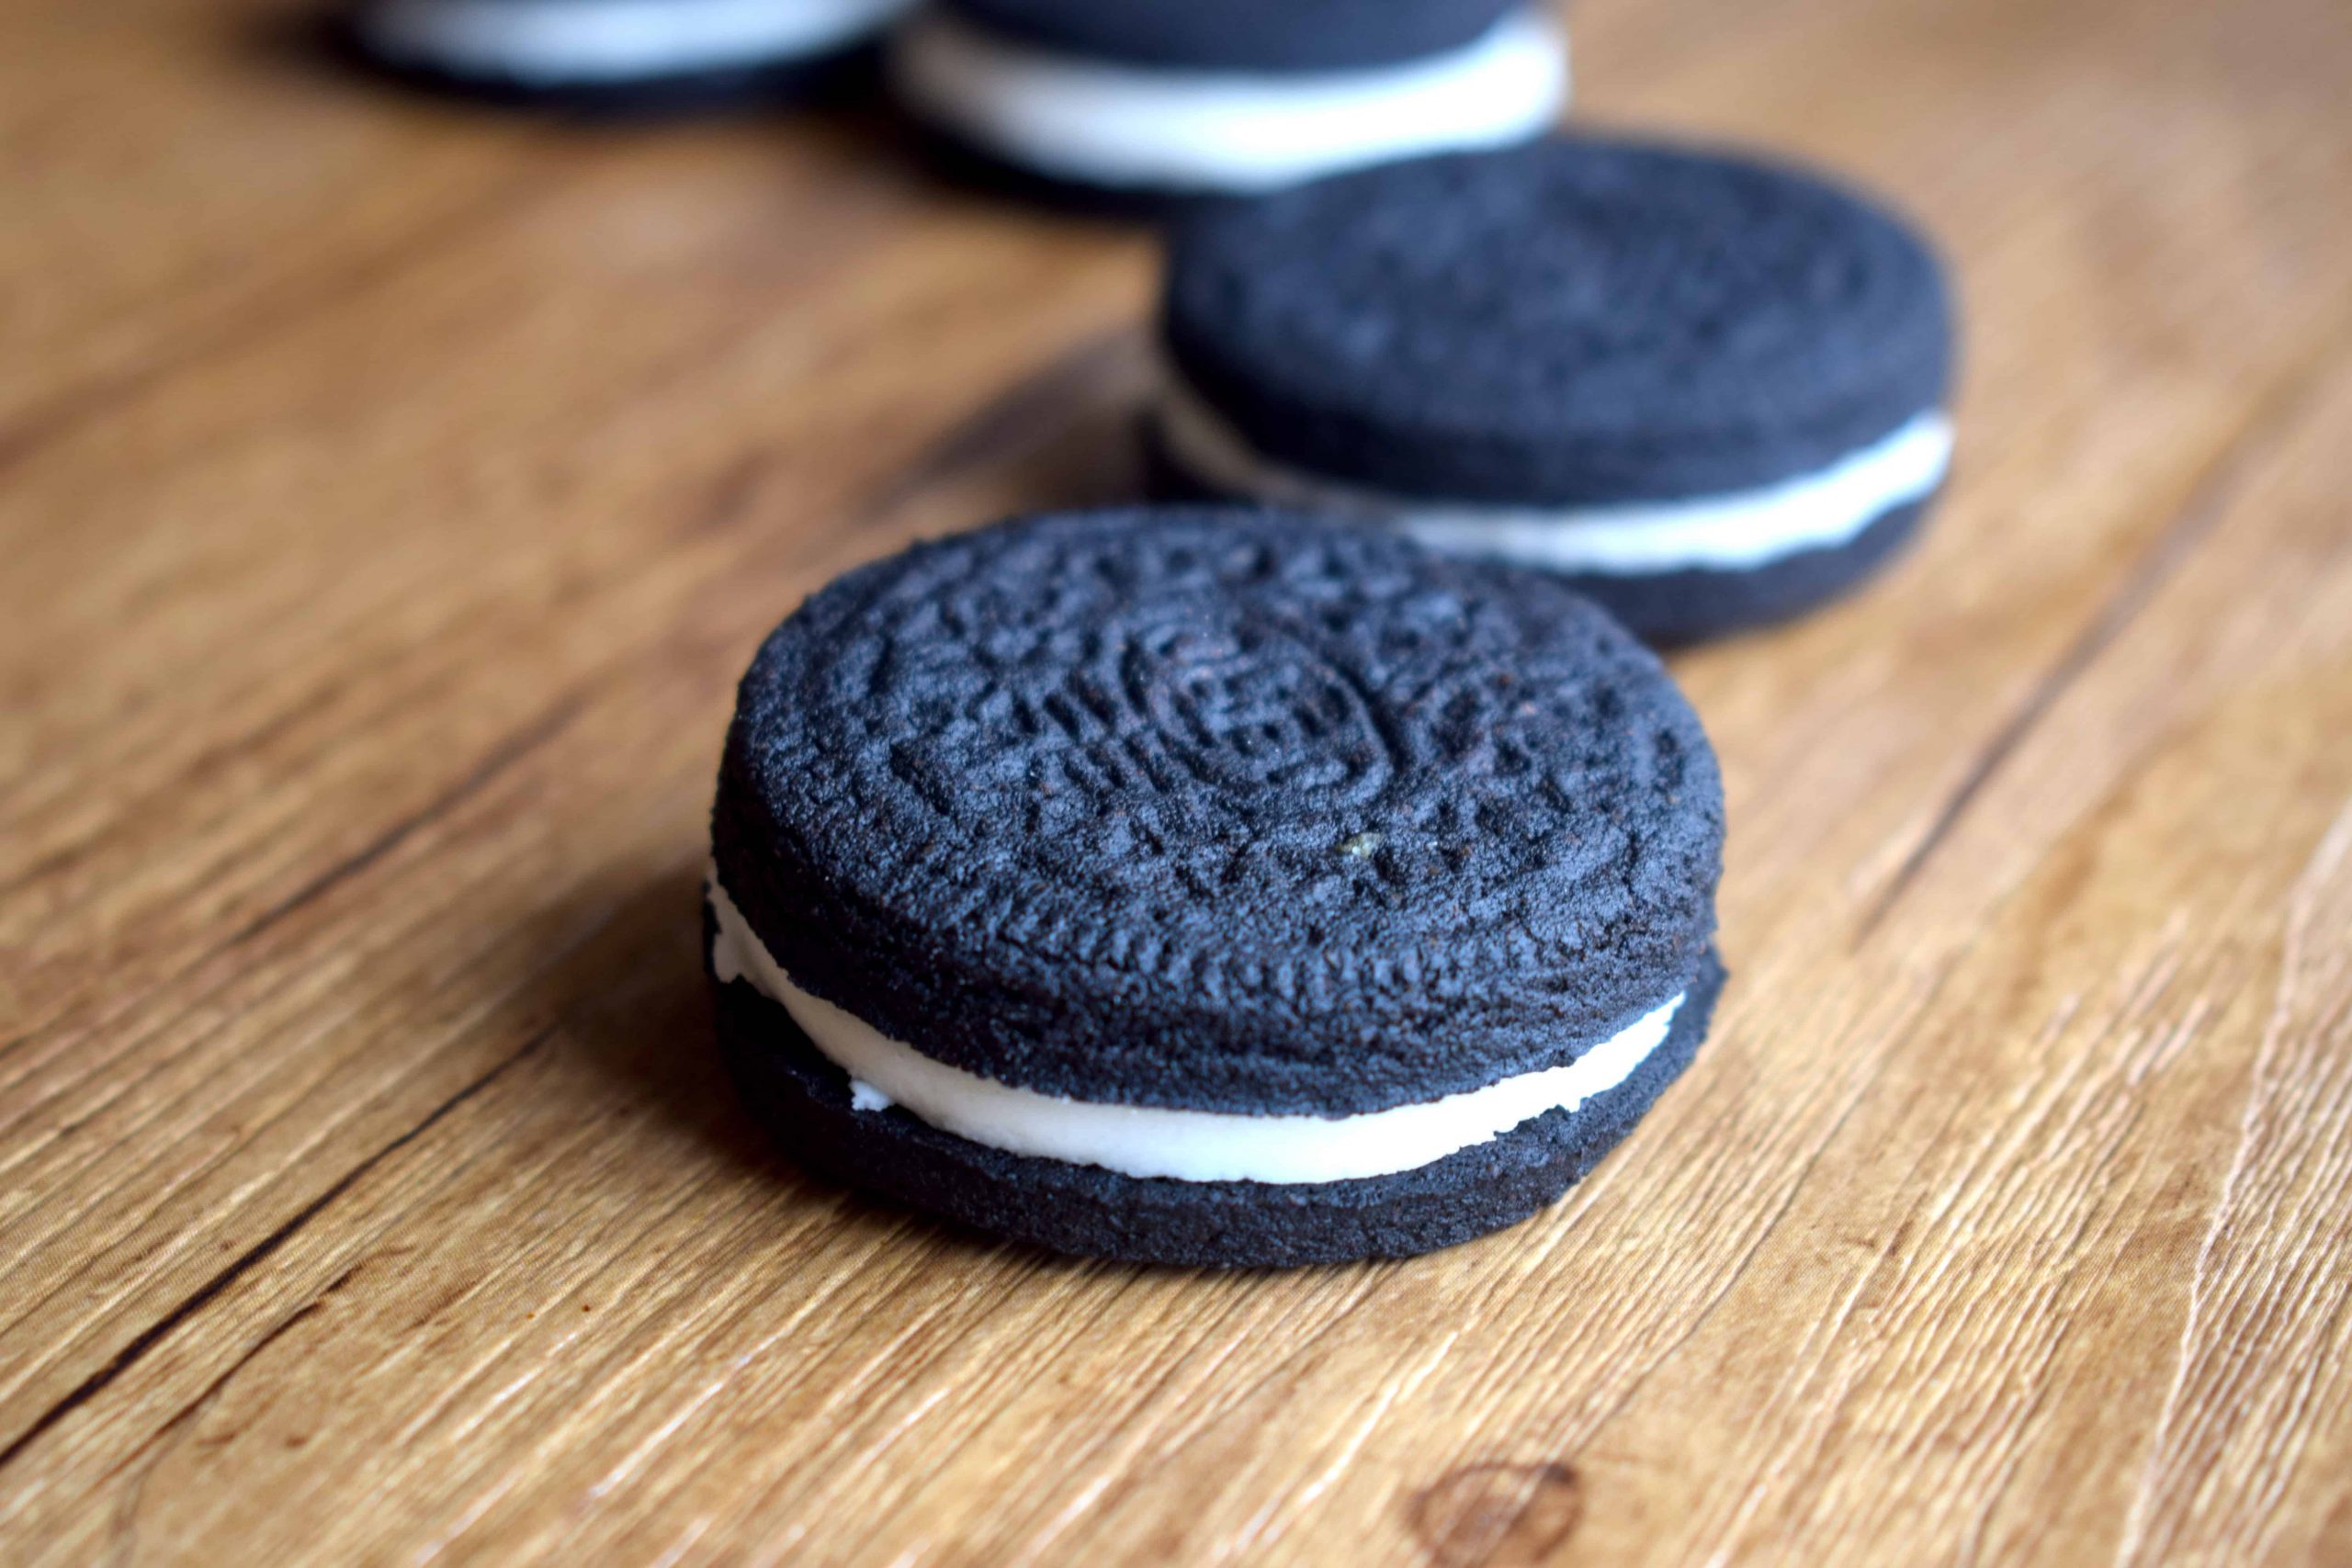


 These Keto Oreo Cookies are something I will remember forever.
This recipe is one that came to me literally in the middle of the night. After watching a cooking competition show where a famous chef talked about making the impossible possible..and then showed a bunch of his crazy dessert inventions.. It got me thinking.. Why HAVEN'T I tried recipes that really push me out of my comfort zone?
There's so many recipes I've want to to try and make but always deemed them too hard or impossible to make keto, at least to the standard I'd want them to come out.
So that's when I thought, let's just go for it and see what happens. WHY NOT. The worst that could happen is that I trash the recipe and bake something else for today's blog post.
But man.. I was absolutely determined to get these Keto Oreos right. And that I did.
On the first try.


I know you guys don't enjoy a lot of rambling in a blog post so you can skip this section if you'd like.. but I really want to show the thought process that went into these cookies so here we go..
Choosing The Flour For My Keto Oreos
First off I racked my brain for anything remotely “Oreo” flavoured that I'd made that was keto in the past.
The only thing I could think of was these little “Oreo balls” I made long before my blog ever even existed. They weren't the best but they were a start.
By taking inspiration from these “Oreo balls” I decided coconut flour would be the best route for these Keto Oreos.
I wanted the cocoa powder to be the star of the cookie so coconut flour makes sense because it's more absorbent than other flours and I wouldn't have to use as much when combined with the cocoa powder. It also would provide for a “smoother” dough less likely to crumble which can happen sometimes when using almond flour.


How to Make Keto Oreo Cookies Spread Less
Next I did some research on how to make my Keto Oreo cookies spread less. I already had some ideas but I wanted to see if I could find anymore special techniques I could try.
I'm glad I did this research because it truly paid off with the cookies spreading hardly at all. This was achieved by using room temperature butter and egg (not at all trying to microwave the butter, just leaving it on the counter for a couple hours). I also decided to only use a small amount of baking soda at 1/4 teaspoon.
I also added an optional ingredient that I think was fantastic for the texture of the cookie which is Corn Starch. Corn Starch is not inherently keto although when used in small quantities for a large recipe such as this (this recipe uses just 1/2 a tablespoon or 3.5 carbs!), you really shouldn't be considered with the minuscule amount of carbs it adds to each cookie. With that said, it can be left out, I just can't guarantee the exact same final texture and look as my cookie.
Finally, when baking the cookies, I'd recommend using a silicone baking matt if you have one or can purchase one as this also helps to prevent cookies from spreading as much.


How to Make Keto Oreo Cookies Crispy
The next step in planning for these cookies was to figure out how I could give them that signature Oreo cookie ‘snap'. The couldn't be soft or flimsy cookies but I also wanted them to still taste as good as they looked!
So again using a past recipe as inspiration, I decided to use an egg white instead of a whole egg because the yolk adds moisture to the dough where-as the egg white by itself adds additional protein and dries the dough out a bit when baked.
I then chose butter as my dough's only fat source and added a few tablespoons of water which typically will cook out in the oven resulting in again, a drier final cookie.
How to Make Keto Oreo Cookies Their Signature Colour and Logo
To make the Keto Oreo cookies the same colour as your traditional Oreo cookies you either need to use a dark cocoa powder OR a black food colouring paste (liquid will water down the dough too much).
I personally didn't have dark cocoa powder on hand so I used this black food colouring paste to colour my cookies.
This step is of course completely optional.
And finally, How did I get the signature Oreo logo on my Keto Oreo cookies??
I just took a regular Oreo and stamped it into the dough, then took a shot glass to cut circles the exact size of the logo!
Again, this is optional and I don't recommend you do it unless you are truly looking to impress!


How do you make Keto Oreo Cookies Filling?
Honestly, this was the easiest part of the whole recipe and actually part of the reason I had wanted to try Keto Oreos in the first place!
I already had the filling idea after making my Keto Cream Cheese Mints. Their texture and flavour was just so close to the filling of an Oreo. I just wondering if I could roll it out flat and be able to cut circles from it…
And apparently you can! This worked out great for the filling. Rolling it out between two pieces of parchment paper is definitely the best way to go about it.
This filling is super simple and made from a combination of cream cheese, powdered monkfruit/erythritol sweetener and vanilla extract. (Bonus: No one even knew it was made from cream cheese).
And that my friends, is how the Keto Oreos were born.


Keto Oreo Cookie Ingredients
- Cocoa Powder– The cocoa powder I use in this recipe is this one. It's not a dark cocoa powder so you will need black food colouring if you still want the black colour of Oreo cookies OR you can buy a dark cocoa powder such as this one.
- Coconut Flour-As I mentioned above, I used coconut flour in this recipe because it's more absorbent and you don't need as much. It works great combined with the larger amount of cocoa powder. This is the coconut flour I use.
- Powdered Monkfruit Erythritol Sweetener – I use the SoNourished brand for both granular and powdered sweetener and love it! The powdered is the best option for no-bake goods and desserts where you want a very smooth final product.
- Black Food Colouring-I highly recommend this food colouring as it's super rich in colour and a little goes a long way!
- Xanthan gum – Provides a better texture to the final cookie
Can I Freeze Keto Oreo Cookies?
- Yes! You can definitely freeze these, just be sure to place them in an airtight container between layers of parchment or wax paper.


Tools I used to Keto Oreo Cookies
- Low Carb Substitution Guide – This is totally optional but if you like my recipes, I now have a $5 guide available with all of the substitutions I use to create every recipe on my site. You can use this to convert old traditional recipes and create new keto recipes! You can purchase it here and/or read more if you are interested. 🙂 I appreciate your support so much guys!
- Nutritional Food Scale – AKA my best friend. This little buddy has been with me for over 4 years and never fails. Perfect measurements and only needs the batteries replaced maybe once a year!
- Baking Slip Matts – Perfect to prevent cookies from spreading to much and/or sticking and allows for a very easy clean-up!
Tips For Making Keto Oreo Cookies
- If you find your filling hard to work with, just add a little more sweetener.
- These cookies definitely harden once cooled so don't worry if they are a little soft when first coming out, let them cool fully on their tray.
If you are having trouble cutting out circles for your cookies or filling, you can try making the dough a little thicker, this will make them easier to pick up without breaking.


How to Make Keto Oreo Cookies
Serves: 26
Ingredients:
Cookies
- 1/2 cup + 2 tbsp cocoa powder, 60g
- 1/2 cup coconut flour, 56g
- 1/2 tbsp cornstarch, optional but recommended
- 1/2 tsp xanthan gum
- 1/4 tsp baking soda
- 1/4 tsp salt
- 1/2 cup salted butter, room temperature
- 1 egg white, room temperature
- 1/2-1 tsp black food colouring, optional
- 1/8 tsp vanilla extract
- 3/4 cup + 1 tbsp powdered monkfruit/erythritol sweetener, 162g
- 2 tbsp water, up to 3 if needed
Filling
- 4 oz cream cheese, room temperature
- 1 cup powdered monkfruit/erythritol sweetener, 200g
- 1 tsp vanilla extract
Directions:
- Pre-heat oven to 350*F.
- In a bowl, mix together your dry cookie ingredients except the sweetener.


- In another bowl, beat together the butter, egg white, black food colouring and vanilla extract until mostly smooth (I added my black food colouring later when I took these photos)


- Next add your sweetener and mix with a spoon first before beating the mixture again to prevent sweetener flying everywhere!
- Once this mixture looks something like this, you can add it to the dry ingredients. Mix using a spoon until somewhat of a dough begins to form.


- Add your water and keep mixing until it's mostly all incorporated.
- At this point, things do get a little messy! I use my hands to form the rest of the dough. (I did get all of the black food colouring off my hands right after if anyone is wondering, haha, just don't wear nice clothes during baking).


- Once you've formed a solid ball of dough, place it on a flat surface between two sheets of parchment paper and roll it out decently thin (about the thickness of an Oreo as they don't rise a lot!).


- This step is optional but you can go around and stamp a regular Oreo into the dough to get your signature logo for each cookie..or just skip this!
- Next, cut out circles using a greased shot glass or another small circle about the size of an Oreo around your logos. (I liked to grease mine every couple cookies I cut out). Stamp the glass down firmly and wiggle it back and forth a bit to create the smooth edges..then remove.


- Take your cut outs and gently lift them with a spatula and place them on your slip mats or a tray covered in parchment paper.
- Remove the excess dough around your cut-outs and roll it out again to repeat the process until all the dough is gone.
- Bake the cookies for 8-11min then let them cool on their trays. It's tough to tell when they are done so I recommend doing a test cookie and letting it cool fully if you can. These harden up quite a lot once fully cooled.


- While the cookies are baking, you can make your filling by beating together the above 3 filling ingredients. Again, at a certain point I find my hands are the best way to form the mixture into a ball of dough.


- I then do the exact same thing I did with the Oreo cookies and roll this dough out between two pieces of parchment paper, then cut circles using a clean, greased shot glass and a clean spatula to lift them (to prevent any black food colouring from getting mixed with the white filling dough). Lift the filling scraps up, and roll it out again if needed.


- Set each piece of filling onto a cooled Oreo cookie and top it off with another half of an Oreo cookie. Repeat for all of the cookies. AND THAT'S IT!


I know these can be a bit of work but the final product is just so worth it! These look and feel so close to the real thing! I hope you guys enjoy your Keto Oreo Cookies :).
Nutrition for 1/26th of recipe (2 cookies with filling): 65 calories | 5.6g fat | 0.3g NET carbs | 1.2g protein


Keto Oreo Cookies

Delicious classic sandwich cookies with a sweet filling.
Cookies
- 1/2 cup + 2 tbsp cocoa powder (60g)
- 1/2 cup coconut flour (56g)
- 1/2 tbsp cornstarch (optional but recommended)
- 1/2 tsp xanthan gum
- 1/4 tsp baking soda
- 1/4 tsp salt
- 1/2 cup salted butter (room temperature)
- 1 egg white (room temperature)
- 1/2-1 tsp black food colouring (optional)
- 1/8 tsp vanilla extract
- 3/4 cup + 1 tbsp powdered monkfruit/erythritol sweetener (162g)
- 2 tbsp water (up to 3 if needed)
Filling
- 4 oz cream cheese (room temperature)
- 1 cup powdered monkfruit/erythritol sweetener (200g)
- 1 tsp vanilla extract
- Pre-heat oven to 350*F.
- In a bowl, mix together your dry cookie ingredients except the sweetener.
- In another bowl, beat together the butter, egg white, black food colouring and vanilla extract until mostly smooth.
- Next add your sweetener and mix with a spoon first before beating the mixture again to prevent sweetener flying everywhere!
- Once this mixture is smooth, you can add it to the dry ingredients. Mix using a spoon until somewhat of a dough begins to form.
- Add your water and keep mixing until it's mostly all incorporated.
- At this point, things do get a little messy! I use my hands to form the rest of the dough. (I did get all of the black food colouring off my hands right after if anyone is wondering, haha, just don't wear nice clothes during baking).
- Once you've formed a solid ball of dough, place it on a flat surface between two sheets of parchment paper and roll it out decently thin (about the thickness of an Oreo as they don't rise a lot!).
- This step is optional but you can go around and stamp a regular Oreo into the dough to get your signature logo for each cookie..or just skip this!
- Next, cut out circles using a greased shot glass or another small circle about the size of an Oreo around your logos. (I liked to grease mine every couple cookies I cut out). Stamp the glass down firmly and wiggle it back and forth a bit to create the smooth edges..then remove.
- Take your cut outs and gently lift them with a spatula and place them on your slip mats or a tray covered in parchment paper.
- Remove the excess dough around your cut-outs and roll it out again to repeat the process until all the dough is gone.
- Bake the cookies for 8-11min then let them cool on their trays. It's tough to tell when they are done so I recommend doing a test cookie and letting it cool fully if you can. These harden up quite a lot once fully cooled.
- While the cookies are baking, you can make your filling by beating together the above 3 filling ingredients. Again, at a certain point I find my hands are the best way to form the mixture into a ball of dough.
- I then do the exact same thing I did with the Oreo cookies and roll this dough out between two pieces of parchment paper, then cut circles using a clean, greased shot glass and a clean spatula to lift them (to prevent any black food colouring from getting mixed with the white filling dough). Lift the filling scraps up, and roll it out again if needed.
- Set each piece of filling onto a cooled Oreo cookie and top it off with another half of an Oreo cookie. Repeat for all of the cookies. AND THAT'S IT!
- I know these can be a bit of work but the final product is just so worth it! These look and feel so close to the real thing! I hope you guys enjoy your Keto Oreo Cookies :).
- If you find your filling hard to work with, just add a little more sweetener.
- These cookies definitely harden once cooled so don't worry if they are a little soft when first coming out, let them cool fully on their tray.
- If you are having trouble cutting out circles for your cookies or filling, you can try making the dough a little thicker, this will make them easier to pick up without breaking.
Other Similar Recipes You May Like:

Keto Chocolate Macadamia Nut Cookies

Keto Caramel Shortbread Cookies


Keto Peanut Butter and Jelly Cookies

Keto Chocolate Caramel Cups
Karlen
Tuesday 21st of October 2025
Could you sub GF all purpose flour if keto doesn’t matter and you’re just wanting a GF version? Would it be an even swap?
Susan
Friday 6th of September 2024
UPDATE!
Chill the filling. Roll into 3/4" balls and press gently between 2 cookies. Works perfectly, and no fighting with the parchment paper. They look like double-stuffed now.
Susan
Friday 6th of September 2024
The filling doesn't roll at all. I've added twice as much sweetener and it's too soft. Going to chill in and roll into small balls by hand to see if that works. Too much expense in this already. I will advise afterwards.
Spirals
Wednesday 10th of April 2024
Instead of food color, I'd mix some black cocoa in with dark cocoa. It will give that signature Oreo flavor. It's a less acidic flavor that's unmistakable.
35 Truly Amazing Sugar-Free Cookies Recipes To Explore 2022
Wednesday 8th of June 2022
[…] 10. Keto Oreo Cookies […]